Bring a skill tree to your next interview
A traditional CV only reveals a fraction of your skillset. Don't leave yourself at a disadvantage. Instead, create a map of your skills to show your true versatility.

Gina, our co-founder, used a mind map style CV when applying for new positions. It helped her stand out from the crowd. And it was a great way to illustrate the broadness of her skillset. Interviewers were always curious about it. And it often became the focus of the discussion. We named this a skill tree since this was a tree view of her skills.
You see, at the core, humans are generalists. But we apply for jobs as specialists. Of course, you must show you have the core skills the job requires. But what you know, in addition to these core skills, tells a lot about you as a person. It can show a passion for learning, curiosity. Also, having a breadth of experience and interest is a driver for innovation, which's becoming more critical for businesses in this increasingly faster-changing world.
So if you are a passionate coffee-nerd or like building trains, make sure to include it in your CV skill tree.
Here you can see my CV skill tree as an example.
The skill tree above is fully interactive. You can zoom, drag, and click. To view it full screen, press the Emberly icon in the bottom left corner.
How to make your own CV skill tree in Emberly
I have made a two-step guide for you to create your own CV skill tree in Emberly.
If you are new to Emberly, don't worry. It's free to use, and I will cover all the basics in this guide.
Step 1 - Build your CV skill tree
Opening Emberly, you will be greeted with the dashboard. Click the New Map button to create a new map. Now you can start adding your topics and skills to your tree.
There is no right or wrong here. How your tree will look depends on your background and the position you are applying for. My tip is to just start adding skills. Things are easy to move around, so your tree will get better and better by trial and error.
I decided to split my tree into three branches that fit well for my engineering background. Projects, Technologies, and Disciplines.
If you are new to Emberly, here is a guide on how to build a skill tree.
Example skill tree
For more inspiration, here is another example skill tree from my co-founder Gina.
Rate your skills
In the CV-tree above, you can see that Gina rates her skills. This way, recruiters can quickly know how proficient she is at each of her skills.
We built this skill rating into Emberly. You can rate your skills on a scale from 1 to 5. Like this:
- 🟡 = You know the basics
- 🟡🟡 = You can do it
- 🟡🟡🟡 = You're decent at it
- 🟡🟡🟡🟡 = You're pretty good at it
- 🟡🟡🟡🟡🟡 = You're awesome at it
You do this rating yourself; therefore, this is just your own subjective opinion. But even so, it still gives a useful general overview of where you are most competent. Just make sure you are ready to back up your claim in an interview.
Flag skills
Are you currently learning a skill? Or perhaps you plan to learn something? Get that information into your tree. These are great discussion starters. And if you are weak in skills relevant for the job, you can show that you are improving them.
In Emberly, there are built-in two learning statuses you can set for each of your skills.
- 💖 = Currently learning
- 🏴 = Planned for learning
Learn how to set learning status.
Add information to your skills
If you want to take it to the next level, you can add some information to your skills. For example, you can add:
- Certifications
- Portfolio pictures
- Link to your GitHub
- Summary of your skill
This information can help back up how skilled you. And if you do creative work, it can showcase your style of working.
For example, if you are a designer, uploading photos of your designs show your skill level. If you are a project manager, your project management skill can contain a list of all your projects.
Here are guides to uploading files and adding links.
Step 2 - Share your Emberly CV
When you feel your tree is good enough, it's time to show the world just how awesome you are.
Share with a public link
The "Public Link" will give anyone view-access to your map. You can, for example, share this by email or as a hyperlink in your regular CV. When anyone opens the link, they will get a full view of your CV-tree, like this example.
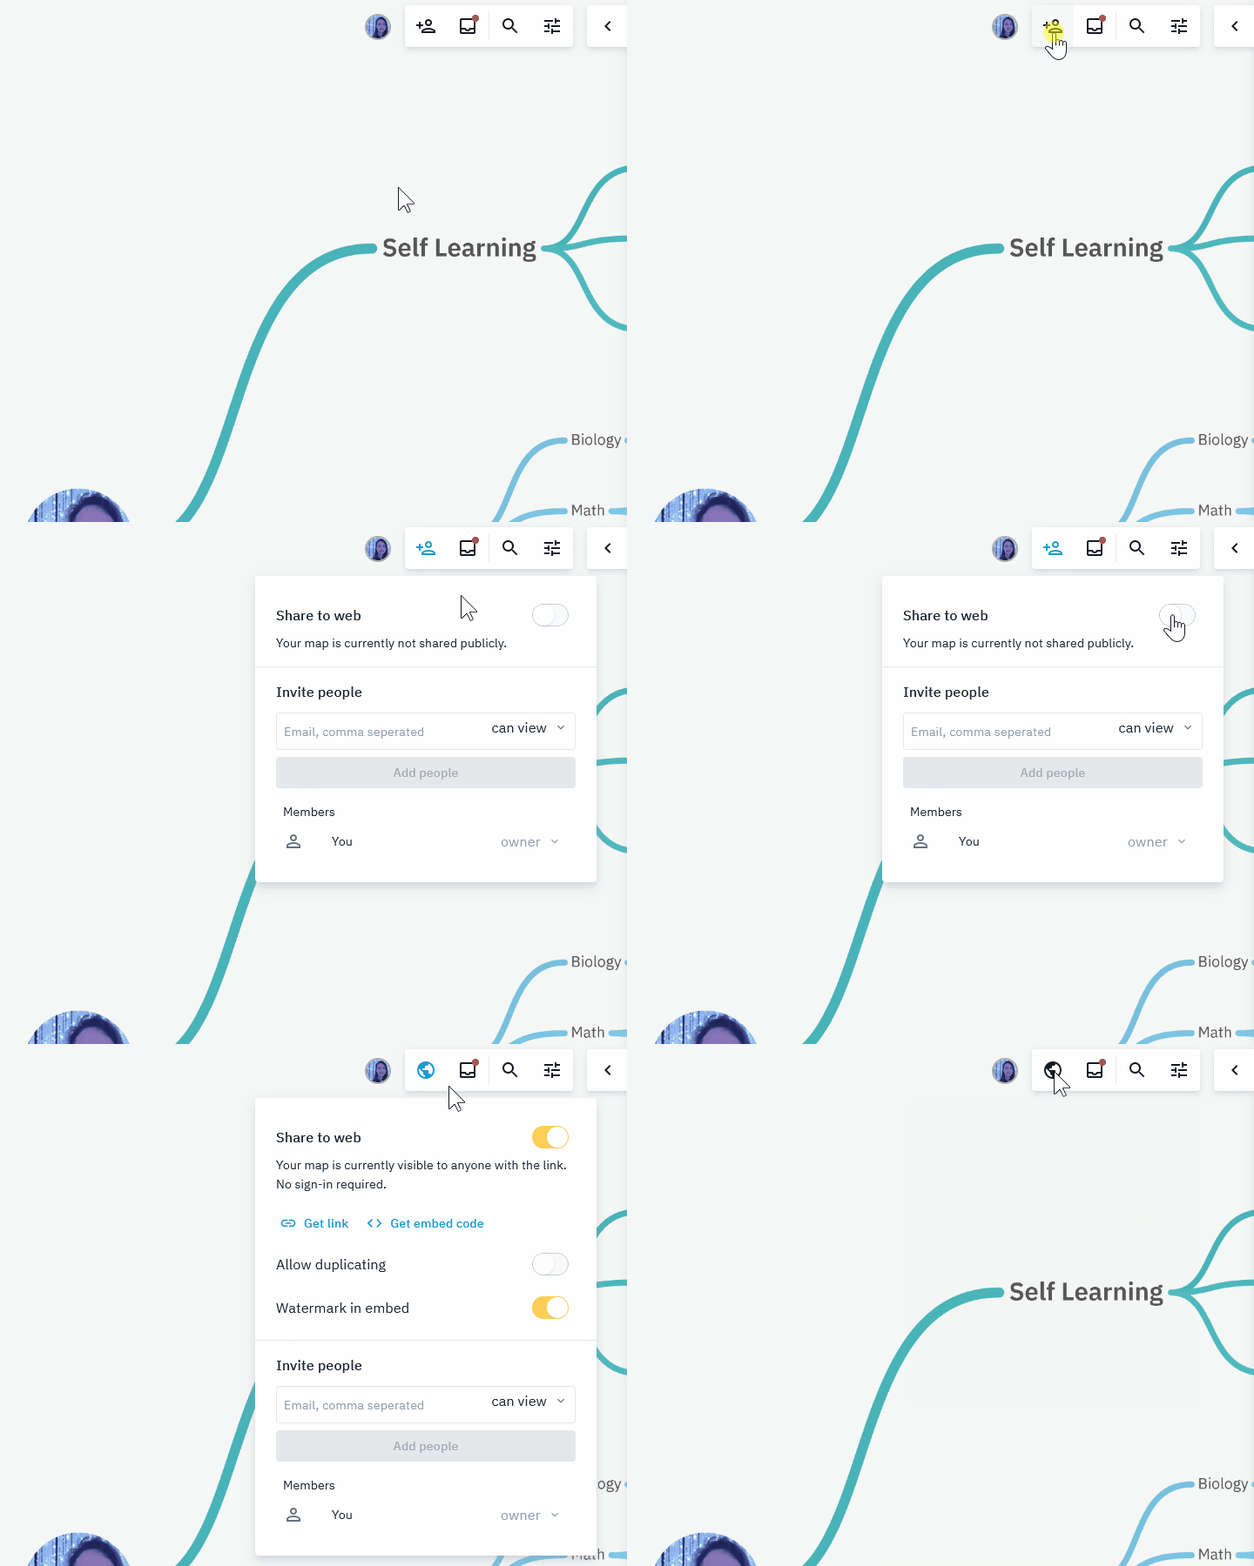
To make the map public:
- Open the
sharing menu - Click the toggle switch next to
Share to web. - Your map is now public.
- Click the
Get linkbutton to copy the public link to your clipboard.

Check out this helpful article for more info on sharing maps.
Get embed code
Share with embed
Suppose you want to embed your new skill tree, (as I did at the top of this article). You have many choices. Check out this article to learn how:

I hope this guide was useful to you! Happy job hunting!
Kind regards, Leif


