
Sharing & Collaboration
Share and work together on knowledge maps in Emberly.


Show the maps you have made with the world, and invite people to build knowledge maps together with you. Shared maps are perfect for collaborating in academic environments, with teams at work, or with your family. Whether you want to collaborate on team wikis or class topics — or share your map with the world, Emberly has you covered.
Share with people
You can invite people to your knowledge map to grow your tree together in real-time. Invite your friends, colleagues, or perhaps your significant other to collaborate. Here are some example use cases for your knowledge map:
- Shared knowledge library
- Team Wiki
- Recipe collection
- Study a class topic together
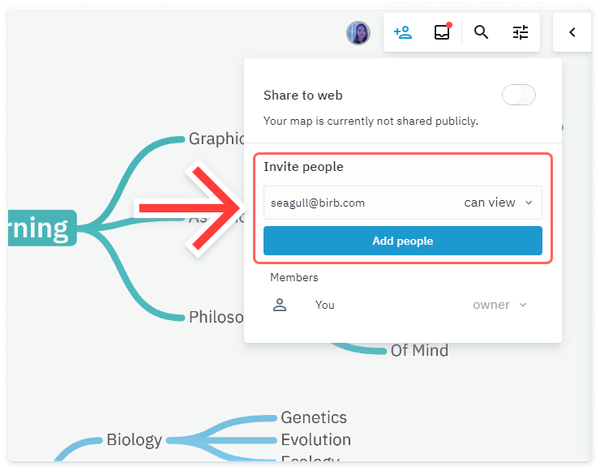
Add people
To add new people:
- Open the map you want to share.
- Then, open the
sharing menu - In the
Invite peoplesection, type in the email of the person you want to invite to this map. - (Optional) Choose the desired permission level by clicking the drop-down menu. It's by default set to "can view."
- Click the
Add peoplebutton to send the invite.
We will now send out invitations to the emails you added. They will be added as members of your map when they accept your invitation.
cancel invite in the
drop-down window next to the invited user's email.Accept invitation
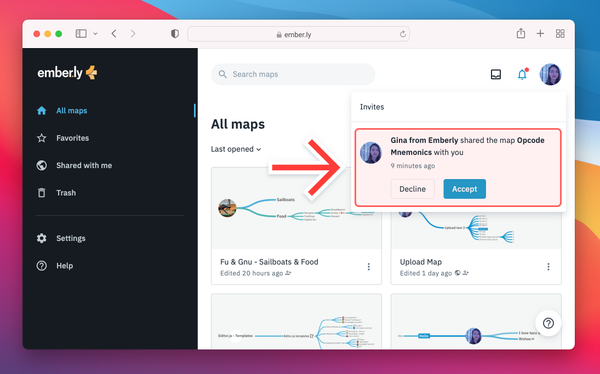
When you have been invited to a map by someone, you have to accept the invitation before you can access the map.
You have two ways of accepting the invitation.
- Emberly dashboard
- Email invitation
Accept from dashboard
You can accept an invitation directly from the dashboard.
- Open the Emberly dashboard
- Click the
bell iconin the top right corner to open the notifications panel. - Click the
Acceptbutton on the invitation to join the map
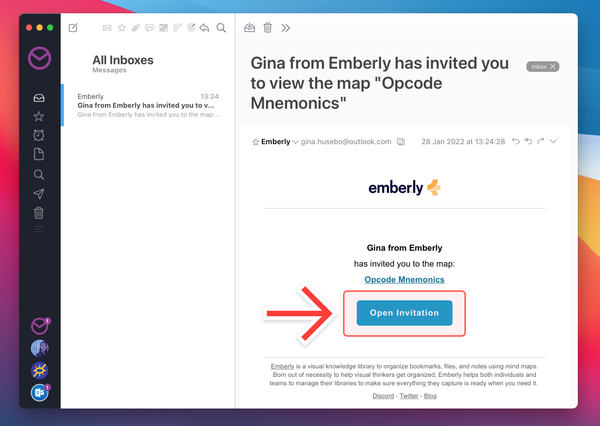
Accept from email
When you are invited to a map, you will receive an invitation email. If you cant find it, try looking in the spam folder.
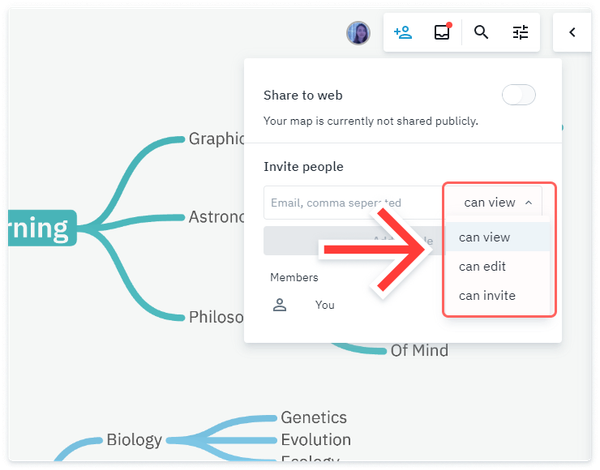
Permission level
You can assign permission levels to people you invite. This is great when you don't want someone to make unwanted changes and mess up your map.
Different permission levels:
Can view- Can only view the map and its content. Cannot edit or share with others.Can edit- Can view and edit the map. But not invite new users, or change sharing permissions.Can invite- Can edit, invite new users, and change sharing permissions.Owner- Have full access to the map, including deleting it.
Remove people
To remove someone's access to your map, you remove them as a member.
Here's how:
- Open the map you want to remove a person from.
- Then, open the
sharing menu - In the
Memberssection, find the user's email you want to remove and click the drop-down menu next to it. - Select
remove memberto remove the person.
This person is now removed from the map.
Share with web
To make anyone able to view your map, or to share it with people who don't have an Emberly account, you can enable
Share with web. Then anyone with a link to your map will be able to view it, but not edit it.
Public sharing is great for:
- Sharing curated content with your audience on your blog or colleagues in your company.
- Share your learning plan with your students.
- Share your CV map on Linked-in, your personal website, or send it to interviewers.
Set map to public view
To make the map public:
- Open the map you want to share.
- Then, open the
sharing menu - Click the toggle switch next to
Share to web. - Your map is now public.

Share public link
Share a public link to give people access to open and view your public map.
- When the map is set to
Share to web - Click the
Get linkbutton to copy the public link to your clipboard.
Get embed code
If you want to embed Emberly in a traditional website, you can get ready-made iFrame code.
- When the map is set to
Share to web - Click the
Getembed code button to copy the iframe code to your clipboard.
Here's an example of the embed code:
See the Pen Untitled by GinaOfTheSea (@GinaOfTheSea) on CodePen.
That's all for this guide. If you have any questions or feedback, please feel free to send me a mail at gina@ember.ly or contact me on the Emberly discord server.
Have a great day!